Why Ceiling Coordination Is the Hidden Failure Point in Modern Window Treatment Design
.jpg)
Ceiling coordination — not the shading system itself — is where most concealed window treatment installations fail. Decide concealed vs. exposed shading during schematic design, then confirm pocket depth, structural backing, and power requirements before the ceiling plane is finalized. Coordinate it late and the result is an RFI, a field conflict, or a ceiling that has to be reopened.
There is a moment in nearly every complex building project where someone asks the question too late: "Where does the window treatment go?"
By the time that question surfaces — during construction documents, or worse, during construction itself — the ceiling has already been designed, the lighting layout is locked, the HVAC ductwork is coordinated, and the AV rough-in is underway. The answer at that stage is no longer a design decision. It is a problem.
Ceiling coordination is the single most common — and most preventable — failure point in modern window treatment design. And it almost always comes down to one thing: the conversation happened too late.
This post breaks down exactly where and why coordination failures happen, what they cost projects in time and money, and how architects can prevent them by integrating concealed shading infrastructure into the design process from the beginning.
What Is Ceiling Coordination — and Why Does It Matter?
Ceiling coordination is the process of aligning all building systems that live at or above the ceiling plane — HVAC, lighting, structural elements, AV infrastructure, sprinklers, and architectural details — so they work together without conflict.
For traditional window treatments, coordination was relatively simple. A bracket mounted to a wall or window frame, and the treatment hung. Concealed shading systems change that entirely. A recessed roller shade pocket, a flush-mounted drapery track, or a fully integrated motorized system requires:
- A defined opening in the ceiling plane — sized, located, and framed correctly
- Structural backing or blocking at the correct framing stage
- Electrical rough-in for motorized systems — low-voltage wiring and power drops
- Clear zones free of HVAC ductwork, lighting fixtures, and sprinkler heads
- RCP coordination with the architect of record
- Coordination with the lighting designer to avoid fixture conflicts at the window head
When any one of these elements is missing or misaligned, the result is an RFI, a field modification, or — in worst cases — a ceiling that has to be opened and rebuilt.

The Three Stages Where Coordination Failures Happen
Coordination failures follow a predictable pattern. They almost always originate in one of three project phases:
1. Schematic Design — The Decision That Never Gets Made
In schematic design, the focus is on massing, layout, and program. Window treatments are rarely discussed at this stage — and that silence is where the problem begins. When a project team does not make a deliberate decision about concealed vs. exposed shading systems during SD, the ceiling is designed without accounting for shade pocket depth, track housing clearance, or motorization rough-in.
By the time shading is specified — often not until interior design or even procurement — the ceiling geometry is fixed. Retrofitting a recessed pocket into a finished ceiling costs significantly more than designing for it from the start, and in many cases it simply cannot be done without compromising the design intent.
2. Design Development — The Coordination Gap Between Trades
Design development is where most coordination conflicts originate. This is the phase where lighting layouts are finalized, HVAC systems are sized and routed, AV infrastructure is planned, and ceiling heights are confirmed. It is also the phase where window treatments are most commonly absent from the coordination model.
The result is a predictable collision: recessed shade pockets conflict with supply air diffusers, motorized tracks require electrical that was never roughed in, and drapery track housings compete with perimeter lighting coves for the same 4 to 6 inches of ceiling depth.
3. Construction Documents — The Expensive Fix
When concealed shading systems are first introduced during the CD phase, the project team faces a difficult choice: redesign the ceiling, specify a different less desirable product, or accept a compromised installation. All three outcomes are expensive. CD-phase changes trigger cascading updates across structural, mechanical, and electrical drawings. RFIs during construction add cost and schedule impact.
What Coordination Failures Actually Cost
The real cost of a late-stage coordination failure accumulates across multiple categories:
- RFI processing time — typically 5 to 15 business days per RFI
- Field modification labor — opening ceilings, reframing, re-drywalling, repainting
- Electrical change orders — adding circuits or relocating rough-in after walls are closed
- Schedule impact — ceiling work that delays downstream finishes, flooring, and millwork
- Design compromise — specifying a surface-mounted system instead of the intended concealed system
- Client relationship cost — delivering a space that does not match the design intent
For a project with 20 to 30 windows requiring concealed shading, a single coordination failure caught late in construction can result in thousands of dollars in direct costs — not including schedule impact or client goodwill.

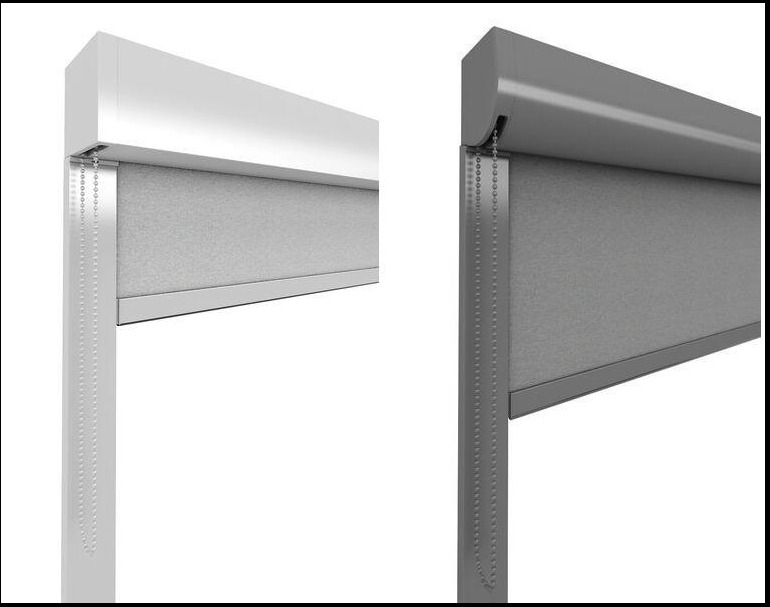
Alt text: Blindspace skylight installation labeled with Head Box, Side Box, and Hem Bar Box showing concealed shading coordination
Labeled Blindspace skylight installation showing Head Box, Side Box, and Hem Bar Box coordination — concealment achieved through early-stage planning.
The Five Coordination Questions Every Architect Should Ask at Schematic Design
The following five questions, asked during schematic design, will eliminate the vast majority of downstream conflicts:
1. Are we specifying concealed or exposed window treatments?
This is the foundational decision. Making it in SD means every subsequent trade can be coordinated against it.
2. What is the required ceiling depth at each window location?
Blindspace S-Series recessed roller shade pockets require a minimum ceiling pocket depth of 5 to 7 inches depending on the system selected. Drapery track housings require 3 to 5 inches. These dimensions need to be reflected in the ceiling geometry during SD.
3. What are the motorization and power requirements?
Motorized shading systems require low-voltage wiring and dedicated power drops at each shade location. Identifying this during SD ensures it is included in the electrical scope from the start.
4. Where are the lighting fixtures, HVAC diffusers, and sprinkler heads near the window line?
The 6 to 12 inches of ceiling adjacent to the window head is the most congested zone. Recessed shade pockets, perimeter lighting coves, supply air diffusers, and sprinkler heads all compete for the same space. Resolve these conflicts during design development — before the ceiling is coordinated.
5. Is there a BIM-ready specification for the shading system?
Blindspace provides Revit-ready BIM families (.RFA files) for all concealed shading systems, allowing architects to integrate shade pocket geometry, structural requirements, and motorization clearances directly into the coordination model.

How Window Modes Supports Early-Stage Coordination
Window Modes works with architects and project teams as a design assist partner — not just a product supplier. Our role includes:
- Early-stage design consultation during SD and DD phases
- Revit BIM families (.RFA) and CAD details (DWG/PDF) for all Blindspace systems
- Ceiling coordination guidance for recessed shade pockets and flush drapery tracks
- Motorization and electrical rough-in documentation for MEP coordination
- Specification writing support for concealed shading systems
- RCP review and coordination checklist for project teams
The Coordination Checklist: Confirm Before CDs Are Issued
Use this checklist during design development to confirm concealed shading coordination is complete:
- Shade system type confirmed — roller shade pocket, flush drapery track, or combination
- Ceiling pocket depth confirmed and reflected in RCP
- Structural blocking or backing locations identified
- Electrical rough-in locations confirmed and included in electrical drawings
- Low-voltage wiring path confirmed with AV consultant
- HVAC diffuser locations confirmed clear of shade pocket zones
- Lighting fixture layout confirmed clear of shade pocket locations
- Sprinkler head locations confirmed per NFPA clearance requirements
- BIM families loaded and coordinated in project model
- Specification section drafted and included in project manual
- Window Modes or authorized dealer engaged for design assist and submittal support

T
Start the Coordination Conversation Early
Ceiling coordination is not a complex process. It is a timely one. The difference between a seamless concealed shading installation and a costly construction conflict is almost always whether the coordination conversation happened during design — or after the ceiling was already built.
If you are working on a project that requires concealed shading systems or recessed drapery integration, there are two ways to engage:
- Architects specifying multiple projects annually may be a strong fit for a Window Modes dealer partnership — providing direct access to Blindspace products, BIM resources, and design assist support.
- For individual projects, we can connect you with an established regional dealer such as J Paul Studio for local installation support.
→ Read Blog #1: What We Learned at AIA 2026: The Growing Demand for Concealed Shading Solutions
→ Coming Next — Blog #3: How to Specify Concealed Shading Systems (BIM, Revit, CAD Guide)
Frequently Asked Questions
What is ceiling coordination in window treatment design?
Ceiling coordination is the process of aligning shading pocket locations, structural backing, electrical rough-in, and clearances with HVAC, lighting, sprinklers, and AV systems before the ceiling plane is finalized.
When should concealed shading be specified in the design process?
During schematic design — before ceiling geometry, lighting layout, and MEP routing are locked in. Waiting until design development or construction documents makes coordination far more difficult and costly.
How much ceiling depth does a concealed roller shade pocket require?
Blindspace S-Series recessed roller shade pockets require a minimum ceiling pocket depth of 5 to 7 inches, depending on the shade system selected. Drapery track housings require 3 to 5 inches.
What happens if ceiling coordination is missed?
The result is typically an RFI, a field modification, a change order, or in worst cases, a finished ceiling that has to be reopened and rebuilt to accommodate the shading system. For a project with 20 to 30 windows, a single late-caught failure can run $15,000 to $40,000 in direct costs.
Who is responsible for ceiling coordination on a project?
Ceiling coordination touches the architect, MEP engineer, lighting designer, AV consultant, and shading manufacturer or dealer. Naming a clear owner for this coordination early keeps it from falling through the cracks between disciplines.
Blindspace recessed pockets & TrackTrim
For your next project